Social Icons

Blank YouTube Email Twitter RSS Feed Blank Google Plus facebook warmaster forum
Showing posts with label Guard Battle Reports. Show all posts

12 March 2013

Guard Tournament Results (part 5)

Rob speaking,

So going into the last game, still in a good position despite my loss last game, game 5  I would be facing off against a very similar army to mine, space wolves and imperial guard.


Game5: Mike Foulks, Big Guns Never Tire, Hammer and Anvil deployment.

PLAYER: Mike Foulks
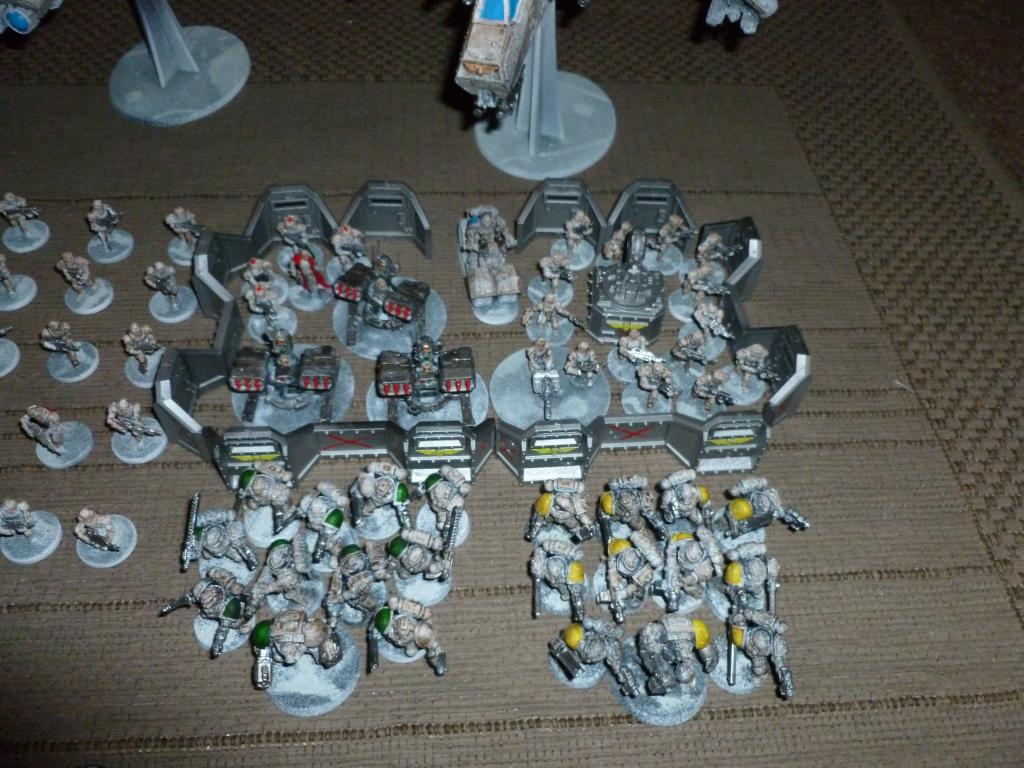
PRIMARY DETACHMENT: Space Wolves
HQ1 : Wolf Guard Battle Leader, frost weapon (axe), saga of the hunter [105 pts]
HQ2 : Rune Priest, living lighting, jaws of the world wolf, runic weapon (axe) [100 pts]
HQ3 : Rune Priest, storm caller, jaws of the world wolf, runic weapon (sword), bolt gun[100 pts]
HQ4 : Rune Priest, living lighting, storm caller, runic weapon (staff), chooser of the slain
[110 pts]
Elite1 : 3 Wolf Guard, 2x terminator armour [84 pts]
Elite2 : Lone Wolf, terminator armour, chainfist, storm shield, 2x fenrisian wolves [105 pts]
Elite3 : Lone Wolf, terminator armour, chainfist, storm shield, 2x fenrisian wolves [105 pts]
Troop 1 : 10 Grey Hunters, 2x melta guns, wolf standard [165 pts]
Troop 2 : 10 Grey Hunters, 2x melta guns, wolf standard [165 pts]
Troop 3 : 5 Grey Hunters, flamer [75 pts]
TOTAL [1114 pts]
ALLIED DETACHMENT: Imperial Guard
HQ1 : Primaris psyker [70 pts]
Elite1 : Psyker battle squad, 9 sanctioned psykers [110 pts]
Troop 1 : Platoon command with vox caster [35 pts]
Platoon squad 1 with autocannon, power axe on seargent [70 pts]
Platoon squad 2 with autocannon, power axe on seargent [70 pts]
Platoon squad 3 with autocannon, power axe on seargent [70 pts]
Platoon squad 4 with autocannon, vox caster [65 pts]
HS1: Manticore Rocket Launcher [160 pts]
FORTIFICATION: Aegis defence line with icarus lascannon [85 pts]

Lots of things to look out for, the Manticore and Lone Wolfs are going to cause a pain, plus the Blob can outflank thanks to Saga of the Hunter! So it’s a nasty nasty list.

Deployment:
Again I was passed first turn so set about deploying the blob centrally, the 1 pack of Grey Hunters on either flank with the Veteran squad on the left flank, the Hyperios had no real position to deploy as there was a hill in the centre of the table that blocked LOS, with 2 large LOS blocking buildings on either flank, so the only position to deploy them was centrally, the Command squads went in reserve, with the Warlord Command squad in a Vendetta.

Mike outflanked the blob, the Manticore then went in reserve, the Grey Hunters all deployed in a line centrally, 1 squad manning the Lascannon from the ADL, the 5 Grey Hunters and Platoon Command deployed in ruins at the very back of the board. The Psyker battle squad then deployed centrally behind a ruined wall, with the Lone Wolfs on the right flank.

Turn 1
Nothing much happened as I have 3 objectives to Mikes 2, It was night fight so the Hyperios who has LOS to a Grey Hunter pack were out of range. Mikes turn 1 he moved up and ran with everything bar the Psyker squad who remained stationary and the Grey Hunter pack on the lascannon.

Turn 2
All 3 Vendettas turn up, again 2 huddle in a corner, but 1 is poking passed the building blocking LOS, the 3rd vendetta comes on the left flank which is hidden by a large ruin,  the Grey Hunters start to back up from there move forwards turn 1, as they need to support the blob from the outflanking blob which is due imminently. Mike then intercepts the Vendetta and takes it out! First blood to Mike! I then do minimal damage again killing a couple of Grey Hunters from a pack on the left flank, moving to the right flank, the Grey Hunter pack and the remaining Vendetta, then strip a single wound from a Lone Wolf and kill one of the Fenrisian Wolves accompanying it.

Mikes turn 2 and the Manticore arrives, the Blob turns up in my bottom left corner, the Lone Wolfs on the left flank and Grey Hunters on the right flank both push up while the 2 groups of Grey Hunters drop back slightly, the Blob opens up into the rear of the Vendetta on the left flank and strips a hull point, the Manticore takes out a Rune Priest and about 10 other Guardsman 3 shots are rolled and all scatter into the blob.

Turn 3
With the arrival of the 2 units that threaten my army I try to deal with these, my blob walks towards Mikes and prepares to charge as do a squad of Grey Hunters, the Vendettas both move to get into range of the Manticore and the Grey Hunters on the left flank move into rapid fire range of the Lone Wolfs, the Vendettas then both fail to scratch the Manticore… 1 even on it’s side armour. The Blob then and Grey Hunters then hit the Blob and the epic combat begins.

Mikes turn 3 and the game only has 20mins left, the Lone Wolves charge the Grey Hunters on the right flank and both remain locked in combat, the Manticore then takes out the Platoon Command knocking me off an objective! This means I’m going to close this game unless the blob can somehow win! The combat continues and takes aaaages to sort out with some really ‘strange’ things going on, in regards to the models which I have to remove and which models Mike starts to remove and the combat ends in a stalemate again, this time dragging me off another objective.

With about 5mins left in the round we decide to call it quits here as there is no time for both players to get in another turn.

Overall:
I wasn’t happy at all after this game, we both took waaay to long to do anything in this game, deciding tables sides, generating psychic powers and warlord traits took about a hour, deployment took ages and we only just got to turn 3… I made a MASSIVE error on the right flank if I hadn’t of got greedy with the Grey Hunters trying to kill the Lone Wolfs they could of dropped back to the objective and the game would have been a 11-9 loss on first blood, but instead I lost 15-5. I was totally gutted with how the game went and how I played, plus a few strange rules interpretations. But there we go,

In the end I finished 45th which is midfield so I have to be happy with that!

As for the tournament overall, it was run excellently as always and even though I had 2 difficult games, I was extremely happy to have attended and there was no bad blood between any of my opponents. I would like to play them again given the chance, I think a lot of the problems came from different rules interpretations and the pressure of time, so not being able to fully read into them caused the friction.

I was also disappointed with the list, it properly let me down, the Vendettas just didn’t cut the mustard in many of the games, I would of preferred more units on the table from turn 1 and I don’t believe Flyers are all they are cracked up to be.

I’m looking forward to my next tournaments in the coming months I have a couple in mind including a team tournament I’m looking at entering!


Read more ...

4 March 2013

Guard Tournament Results (part 4)

Rob speaking,

So after a good day 1, I was sitting on 2 wins 1 loss and am sitting mid 20’s which is pretty good for me at least. I would be looking for 1 more win from today to see me into a good position and would leave me feeling pretty satisfied with 3 wins, 1 defeat with 1 game to play, so onwards to game 4!

  
RICHARD ARNOLD

HQ1 Fateweaver (333) total [ 333]

HQ2 Herald of Tzench (50) icon (25) Chariot (15) total [90]

Elite 1 : 6 Fiends of Slannesh (180) Un-holy might (10) total [190]

Elite 2 : 6 Fiends of Slannesh (180) Un-holy might (10) total [190]
Troop 1 : 5 Plaguebearers [75]

Troop 2 : 5 Plaguebearers [75]

Troop 3 : 5 Plaguebearers [75]

Troop 4 : 7 Horros (119) Changeling (5) total [124]

Fast Attack 1 : 8 Screamers [200]

Fast Attack 2 : 8 Screamers [200]

Fast Attack 3 : 8 Screamers [200]

Emplacment 1 : Bastion (75) comms relay (20) [95]

Total = 1847

Richards army was not the typical Daemon build at the tournament, there were no flamers which pleased me greatly, but there were still plenty of Screamers and the Fiends would do a number on the Blob if I ventured out of cover. The plan was to castle on an objective or 2 and then shoot his troops (only 4 small squads), meaning as long as I’m not tabled I will get points out the game! 


Deployment: In a haze of lack of sleep I took first turn and would set up in a corner, hunkering down waiting for the Daemons to drop. I deployed just the blob, both guard command squads and the Veteran squad went in the vendettas and both the Grey Hunter packs went in reserve waiting for the Daemons to drop so I could react to them. 


Turn 1
Nothing happens for me as I’m sat pretty well behind my Aegis. 
Richard gets his preferred wave which is massively stacked, 3 Screamers, Fateweaver and both Fiend squads come down. The FW lands towards my right and scatters way back to the centre of the table, which is ideal, then all the Screamers land basically in a line, dropping slightly to the left of FW and in a line towards my board edge, the Fiends then land to the right of FW opposite the Blob, I then intercept the FW and cause a wound which is passed on a 10! Close but no cigar! Everything turbo boosts/runs into range of FW. 


Turn 2
I get both Grey Hunter packs on and they move into Rapid Fire range of 1 squad of Screamers, 2 Vendettas also come towards the left flank, the Vendettas open up and take another wound off FW between them, the test is passed. The Grey Hunters fire into the Screamers and kill 1 between both packs... the blob then fires into the Fiends and kill 2, reducing another by a wound.

Richards turn and 1 plague barer squad arrives, which lands towards the back of the table, FW moves towards a Vendetta on the left flank, the Screamers and Fiends all move towards the Grey Hunters, 1 squad of Grey Hunters are then eradicated by turbo boosts Slash attacks by the Screamers. 


Turn 3
I get the Bike on and Vendetta, the bike moves and turbo boosts up the left flank, the 3rd Vendetta comes on from the right flank, the 2 Vendettas move to target the Plague Bearer squad that landed, the blob fires into the weakened Fiend unit and reduce it to 2 models. The Vendettas then all open up on the Plague Bearer squad and Richard rolls well as they are left with 1 bearer left.

Richard only gets 1 more unit of Plague Bearer squad which lands on the left flank way towards the left flank, the Screamers don’t really move then take out the other Grey Hunter squad in combat. The FW shoots down a Vendetta with it’s bolt shot, the Platoon Command dies horribly as a result. 


Turn 4
The bike moves down the left flank and I forget to boost it, the Vendetta on the right moves to target the plague Bearer on its own and doesn’t wound it.. so the Hyperios Missiles are needed and they kill it off, the Vendetta on the left flank moves off the table.

Richards turn 4 is over pretty quick, 1 squad of Screamers moves over to take the bike out, but Richard forgets to charge him, the Plague Bearers all make their moves for the objectives which they all achieve, with some good moving through cover rolls, the FW bolts the only Vendetta on the table and it survives. 


Turn 5
The Vendetta in reserve moves on, the other Vendetta moves and they both shoot into the Plague Bearers in the open on the left flank, but can only kill 3, the Bike then kills another Plague Bearer, then charges in, wounds with Hammer of Wrath, but Richard saves, then the Bike wounds again with his attacks, but that is also saved!!

Richard then moves over the with the Screamers that didn’t charge last turn and they finish off the Biker, while consolidating doesn’t get the lone Plague Bearer  into objective range, Richard then consolidates his position on the 2 objectives he does have and also gets Line breaker giving him 2 Secondary VP's and 1 objective more than me. Then Fateweaver guns down his second Vendetta of the game with a bolt into the rear armour. 


If the game ends now It will be a 15/5 loss, so I still get decent points out the game after taking a battering, but if the game does continue I have a Vendetta to take out a single Plague Bearer so I’m confident either way. But the game goes on!


Turn 6
The Vendetta drops out of zooming mode and into skimmer mode, then fires 3 Lascannons and 2 Heavy Bolters into the lone Plague Bearer, and misses with everything first time round, then hits with 2 lascannons on the twin linked roll, needing 2’s I get 1 through, Rich then fails his save... then passed FNP and the Plague Bearer survives...

The lone Pleaguebarer moves onto the objective to give Rich 3 more tournament points as I cannot reach him we call it quits here.


Overall
I didn’t play well in this game at all, again, showing some really basic errors even with objective placement... which I really beat myself up about. Basically my plan order all along was for the Blob to camp on an objective behind the ADL, which the Daemos couldn’t cross without being shot to bits through Overwatch, I would also be striking first and it’s a massive deterrent, but for some reason I only placed one objective in the corner... totally idiotic, but there we go. As Richard only had 4 troops choices I was banking on Richard rolling the wrong wave, which didn’t happen, if he had I would of hoped to have had 1 or 2 turns of shooting at them before the nasty stuff arrived, but it didn’t happen and the Vendettas again fluffed their chances or Richard rolled well above average. 

 
Richard totally deserved his win though, he took me apart but I still got 2pts out the game... 18-2 Defeat and back down the tables I tumble!

Game 5 coming up next...

 
Read more ...

28 February 2013

Guard Tournament Results (part 3)

Rob speaking,

Moving onto Game 3, you can see my list here


Game 3: David Calder, Tau, Purge the Alien, Hammer and Anvil deployment

PLAYER NAME: David Calder
Army Description: Tau
HQ 1: Shasel (50), Fusion Blaster (12), Plasma Rifle (20), Black Sun Filter (3) Iridium
Armour (20), Advanced Stabilisation System (10), Hard Wired Drone Controller, Hard
Wired Target Lock (5), Hard Wired Multitracker (5), 2 Shield Drones (30),(Warlord) = [155]
TROOPS 1: 12 Fire Warriors = [120] + TRANSPORT 1
TROOPS 2: 12 Fire Warriors = [120] + TRANSPORT 2
TROOPS 3: 10 Kroot = [70]
TROOPS 4: 10 Kroot = [70]
FAST ATTACK 1: Tetra (50), Sensor Spines (10), Targeting Array (5) = [65] FAST ATTACK 2: Tetra (50), Sensor Spines (10), Targeting Array (5) = [65]
HEAVY 1: XV88 Broadside (70), Team Leader (5), Twin Linked Plasma Rifle (10),
Multitracker (5), Hard Wired Drone Controller, HW Black Sun Filter (3), 2 Shield Drones,
(30) , Additional XV88, (70), Twin Linked Plasma Rifle (10), Multitracker (5), Additional
XV88, (70), Twin Linked Plasma Rifle (10), Multitracker (5) = [298]
HEAVY 2: Hammer Head Gun Ship (90), Plasma Cannon (15), Burst Cannons (10), Multi
Tracker (10), Black Sun Filter (5), Disruption Pod (5) = [135]
HEAVY 3: Hammer Head Gun Ship (90), Plasma Cannon (15), Burst Cannons (10), Multi
Tracker (10), Black Sun Filter (5), Disruption Pod (5) = [135]
TRANSPORT 1: Devilfish (80), Sensor Spines (10), Disruption Pod (5) = [95]
TRANSPORT 2: Devilfish (80), Sensor Spines (10), Disruption Pod (5) = [95]
ALLIED DETACHMENT: Orks
HQ1: Big Mek (35), Kustom Force Field (50) = [85]
TROOPS 1: 30 Ork Boyz = [180]
TROOPS2: 10 Ork Boyz = [60]
TOTAL: 325
FORTIFICATIONS Aegis Defence Line (50), Quad Gun (50) = [100]

So looking at David's list, it contains a lot of things to worry the Grey Hunters, with the combination of the Tetras and the plasma turrets on the Hammerheads (4 tl shot plasmagun range 48” i believe)(Tetra 4 TL BS4 marker lights that can plus BS or minus cover). The Orks make for an interesting screen. I feel I will be struggling to get any points out of this game, with only the Kroot looking vulnerable as the Fire Warriors can keep their range and I don’t really have the shooting to deal with the Devilfishes 


Deployment: (night fight turn 1)
I was given first turn (again) and set about deploying my Aegis towards the right flank, David deployed his on the left flank, so I kinda knew where he would be going, David then got to choose if night fight turn 1 or not, and he chose yes. I then deployed with the Hyperios missiles and the blob on the left flank, everything else went on the right flank. David then deployed the Devilfishes, Broadsides and Warlord Battlesuit together behind the Aegis on the left flank and the Tetras and Hammerheads on the right flank. With Orks deployed in a ruin out front centrally the Kroot are then outflanking.
  

Turn 1
David had deployed out of 36” range of the Hyperios apart from the Quadgun, as I had no other long ranged fire power, I spent a turn moving the Vet squad away from the board edge on my right and the blob moved infield, slightly. David moved up the left flank with Devilfishs, the Hammerheads and Tetras on the right move down, they then opened up on the Grey Hunters, with a reduced cover save they are reduced to about 5, but they had to go to ground. The Broadsides and Quadgun fail to hurt the Hyperios Missiles.
 

Turn 2
I got all 3 Vendettas who can just about squeeze into a gap the Quadgun cannot get to bottom left, the blob shuffles infield again, the Veteran squad moves away from the board edge, the Vendettas and Veteran squad then remove both of the Tetras giving me first blood and 2 KP's. David's turn 2 and both sets of Kroot arrive on my right flank, both Devilfinishes turbo over towards the ruin in the centre of table to maintain their 2+ cover save! The Hammerheads continue to push forwards aggressively down my right flank. Shooting sees a squad the battered  Grey Hunters reduced to 2 from the Hammerheads, then the Kroot finish them off.
 

Turn 3
With the Kroot in my lines I needed them gone because the platoon command was pretty close hiding behind a wall, which could easily be reached in a turn or 2 at the very most, so the blob moved over again and the Vendettas moved forwards just in front of a Hammerhead, the Hyperios bounce off the Devilfish, the Grey Hunters, blob and Veterans all open up into the Kroot and kill 1 squad off and maim another, for another KP. Dave's turn 3 and the Hammerheads on the right flank continue to push into my lines, this time both Fire Warrior squads jump out the Fishes and everything then opens up into the small Grey Hunter pack and Veteran squad, both are removed for 2 KP's.


Turn 4
The blob again moves towards the right flank as that's where the action is, the 10 Grey Hunters move forwards towards the Fire Warriors, the Vendettas then all move off the table, the blob then removes the 2nd kroot squad and the rest of my shooting whiffs as the Grey Hunters only kill a couple of Fire Warriors. The Hyperios missiles fail to scratch the Devilfishes again! David's turn 4 a Hammerhead comes crashing through the Aegis and into the Blob, which passes the tank shock, the Hammerheads and Fire Warriors all throw out sickening amounts of fire power into the blob command and Grey Hunters, the command goes to ground and lose 1 Guardsman, the Grey Hunters are removed through weight of shots.


Going into turn 5 I think it’s a good point to go through where we stand: I have taken out both Tetras and both Kroot squads and have first blood for 5pts. David has removed both Grey Hunter packs and the Veteran squad for 3pts.


Turn 5
The blob positions itself to get into combat with a squad of Fire Warriors and the Hammerhead, the Hyperios take out the Quadgun that's been shooting them all game along with the Broadsides (who have done no damage to the Hyperios Missiles). Now we have a little bit of a disagreement, I’m still not 100% sure how it really happened, but I declare a charge on the Fire Warriors and Hammerhead for a disordered charge, so I move closest to closest which is the fire warriors, then I move up keeping coherency, then I begin to move the meltabombs into the hammerhead at that point David stops me saying they still have to move towards the fire warriors, we have a min debate and then David concedes the point and I finish the combat, 1 Fire Warrior remains, who actually wins combat, as the 3 meltabombs explode the hammerhead killing about 10 Guardsman in an epic explosion.

David's turn 5 and the Fire Warriors in the open jump in a Devilfish which flies off as does the other, then the Broadsides open up on a Vendetta which has it's left wing passed a ruin, it’s then hit, penned and destroyed for another KP to David, in combat the lone Fire Warrior is hacked down and the blob moves up 6” towards the other Hammerhead.


We roll for the end of the game and we go to turn 6


Turn 6
The blob moves up and charges the Hammerhead with 3 meltabombs planted on it with 2 pens it explodes, and kills another couple of Guardsman. The vendettas in the meantime have dropped into hover mode and are cowering behind the ruins in the centre of the table from the Broadsides.

Davids turn 6 is basically a none event, the Orks which have moved up need an 11” charge to get into the blob, but they are moving through terrain, and the blob is so strung out there is noway it can all be killed and the Overwatch takes it out of charge range anyway.


At this point we have to call the game as we’re out of time, so we don’t roll for a turn 7.
 

Overall:
I was happy with the win, it ended 8-4 (18-2win) on points with me getting first blood as the only secondary objective achieved. It was a shame about the rules dispute which all seemed very strange, even now, I’m not sure why it even happened, if I’m wrong please point it out. Ignoring that moment in the game, the game went okay for me, doesn’t any game you win heavily? But the Vendettas are still whiffing, it took all 3 and the Veteran squad’s lascannon to take out 2 AV10 open topped 2hp vehicles, so they are starting to become more of a hindrance than help! Because they are so vulnerable to a first blood intercept and they have to be kept out of range, which usually means they are huddled in a corner so don’t do much turn 2 when they arrive, everything they have done they fluffed it /rant!


Moving into game 4 and I’m climbing the tables once again!


Read more ...

22 February 2013

Guard Tournament Results (part 2)

Rob speaking,

So moving up the tables after a good win game 1, I had hoped I would be avoiding a really nasty list, but my luck was not in!


Game 2: Gary Percival, Tyranids, Relic and Emperors Will combined, with Pitched Battle deployment:

GARY PERCIVAL
Hive Tyrant (170) wings (60) Twin Devourers (15) Twin Devourers (15) Old advisory (25)
paroxysm, leech essence (0) = 285
Hive Tyrant (170) wings (60) Twin Devourers (15) Twin Devourers (15) Old advisory (25)paroxysm, leech essence (0) = 285
Doom (90) Mycetic Spore (40) = 130
2 Hive Guard = 100
2 Hive Guard = 100
10x Termagants with flesh borers = 50
Tervigon (160) Catalyst (15) Toxin sacs (10) adrenal glands (10) cluster spines (0)= 195
Harpy (160) Cluster Spines (0) = 160
20 x Gargoyles (120) Adrenal Glands (20) = 140

A much more fine tuned list than Dave's, with 2 Tervigons spawning gaunts and the Harpies for extra flying MCs, this list will give me much more trouble, but I have a chance as the mission favours me.

Deployment: (Night fight not in effect turn 1)
For some reason I won deployment zones and began to deploy, then Gary deployed as well before we’d rolled for who had first turn.... Gary then won the roll off and elected to go first. I deployed centrally not knowing where Gary would go, I kept the Platoon command on my objective with the Blob surrounding it, the Grey Hunters deployed in the left flank to go for the Relic or cut back to support my objective if needed, both the Warlord command and Veteran squad went in the 2 Vendettas.

Gary deployed in a big block with the Tyrants and Harpies out front, 1 Tervigon behind with Gant support, 1 Tervigon goes on the left flank on Gary’s home objective, with the Gargoyles on the right flank.

Turn 1
Gary moves up with all 4 flying critters and push them all into my face, 1 Tervigon poops out 15 and rolls a double, the other poops out 7 or 8 and doesn’t. These then all move up towards the Relic... the Gargoyles then move up to support the flying critters, Gary then throws all his fire power (both Tyrants and Harpies) fire into the Grey Hunters, both squads are reduced to a handful, of which 1 fails moral and runs off the table! Giving away first blood. My turn 1 the blob moves up, the remnants of the Grey Hunters move up as does the Platoon command who are cowering out of sight behind a ruin. The blob then clear’s a large unit of Termagants, the Hyperios and Grey Hunters combine fire into a Hive Tyrant killing it.

Turn 2
Gary drops 1 Harpy and the Hive Tyrant in preparation to charge, the Gargoyles move up to support, then the Tervigon poops out another 15 or so Termagants on his home objective but rolls a double. Both Tervigons then move up towards the Relic, as a squad of 5 Termagants grab it. The Hive Tyrant declares a charge and takes to all the Overwatch hits, the Gargoyles and Harpy move into combat as well, the blob takes a lot of casualties, but kills a few Gargoyles and passes moral. My turn 2 and 2 Vendettas come on, both of the left flank but the game is basically up, I throw everything into the Harpy out of combat killing it, then throw whatever is left into the Termagants holding the relic, I need to stop that moving backwards! Into combat and the blob takes another battering, but thins the Gargoyles to a handful, a Rune Priest then Force Weapons off the Harpy.

Turn 3
The Doom stays in reserve again, the Tervigon moves and grabs the Relic, the Hive Guard start to fire into the Vendettas, thankfully, they all miss. Straight into combat and the blob stem the losses somewhat, killing more of the Gargoyles, they are reduced to 7-8, but the Hive Tyrant takes all the hits on the chin as I fail to wound with a single hit! My turn 3, the Grey Hunters move up to tackle the Hive Guard, the 3rd Vendetta comes on and the others position themselves to take out the Tervigon, the Vendettas then all light up the Tervigon and reduce it to a couple of wounds, the Grey Hunters fire into the Hive guard and do nothing! Back into combat and the blob is down to just 4 Sergeants and 3 bods with attached friends, the Gargoyles are wiped out, but they all remain locked in combat with the Hive Tyrant.

Turn 4
The Doom comes down in my deployment zone and takes out all the Hyperios Missiles and most of the Blob command holding my objective... some spawned Termagants make a move towards the combat involving the blob and Tyrant, the Tervigon retreats with the Relic back away from the Vendettas. More spawned Gants move up and take out the remnants of the Grey Hunters, the Hive Guard then shoot down the Warlords Vendetta, killing all the contents. The Termagants charge the blob and a combination of them and the Hive Tyrant finish all but finish them off, just a Rune Priest left who does nothing to the Hive Tyrant. My turn 4, things are looking bleak now, as the Doom takes out the rest of the blob Command who fail to get out of the 6” range. The Vendettas drop out of zoom mode and take out the Tervigon holding the Relic, combat is quick as the Rune Priest is crushed by the Hive Tyrant.

Turn 5
Everything tries to get shots off on the Vendettas which are my only things left... but somehow they both survive, 1 is limping badly with 1 HP left, but its still going! The other survives a Vector Strike and a Hive Tyrant's shooting 1 2HP left, a Termagant pick up the Relic once again. My turn 5 and I see a ray of light, I zoom over the Tyranid horde and grav chute the Veteran squad in and they land bang on target, contesting the Nid objective, then I make a MASSIVE mistake (I think), I fly over with the Vendetta still in skimmer mode, then open up with everything into Termagants holding the Relic, I should of declared focus fire (but I’m not sure vehicles can??) the Gant holding the relic is 3 Gants in, I get 3 wounds after some shockingly poor rolling, now if I had declared focus fire the 3rd wound would of killed the Relic holder... but instead some Gants are touching cover so get a 3+ cover save and 2 die... close but no cigar.

So at this point Gary has won primary by 3 (as a Gunt is holding the Relic) and winning secondary by 2 (as I have line breaker), so will be a narrow ish defeat if the game ends now!

But no! My luck doesn't continue and the game goes to turn 6, The Termagants and Tervigon protecting Gary's home objective finish off the Veteran squad that contested the objective turn 5, the Vendetta survives the few shots that are thrown at it, my turrn 6 and the Vendetta drops into hover mode to stay on the table.

As we only have 30 seconds left we don't roll for a turn 7 and the game ends, with Gary holding his own objective and the Relic inflicting a heavy defeat on me, which was either 14-6 or 16-4 (memory fail).

Overall:
Well, things went downhill pretty early with my Grey Hunters running off the table, but I deployed poorly with them stranded in the open, behind the Aegis they could of GtG for a 2+ cover save, drastically reducing the casualties, I then would of had a chance of first blood and then 15+ Grey Hunters to help the blob in combat, if the Gargoyles are taken out before they do lots of damage to the blob the game changes I also kept the Rune Priests back, they should of been much closer to the front. But a steep learning curve and an enjoyable game scrapping for every tournament point I could get!

Back down the tables I go!  Game 3 up next!

Read more ...

8 February 2013

Guard Tournament Results (part 1)

Rob speaking,

So the other weekend I attended Caledonian, one of, if not, the biggest independent tournament in the UK scene at the moment, which is run amazingly by Tim King, the event was attended by 84 people in the end as the snow took it's toll, but it was still a good turnout.


You can see my list here, I totally forgot my phone so there are no pics which is gutting! But here we go!
Game1: Dave Williamson, Tyranids, The Scouring with Vanguard Strike Deployment:

HQ1 : Hive Tyrant 170pts, 2x sets of Twin-Linked Devourers with brain leach worms 30pts,
Wings 60pts, Old adversary 25pts, Regeneration 20pts, (Total 305pts)
HQ2 : Hive Tyrant 170pts, Lash whip and bone sword, 1 set scything talons, Armoured
Shell 40pts, Old adversary 25pts, 1x Tyrant Guard Rending claws and scything talons.
60pts, (Total 295pts)
Elite1 : 3x Hive Guards 150pts
Elite2 : The Doom of Malan'tai 90pts (Transport 1)
Elite 3 : 2x Zoanthropes 120pts
Troop 1 : 13x Termagants flesh borers 65pts
Troop 2 : Tervigon, Cluster spines, Scything talons 5pts, Adrenal Glands 10pts, toxin sacs
10pts, Dominion, catalyst 15pts (Total 200pts)
Troop 3 : 3x Tyranid Warriors 90pts, Scything Talons, 2x Deathspitter 10pts, 1x venom
Cannon 15pts (Total 115pts)
Troop 4 : 30x Hormagaunts 180pts, ToxinSacs 60pts, Scything talons, (Total 240pts)
FA 1: 20x Gargoyles 120pts, Toxin Sacs 20pts, Fleshborer,(Total 140pts)
HS1: Biovore 45pts
HS2: Biovore 45pts
Transport : Mycetic Spore ripper tentacles 40pts

So after a brief look at the list before the game I was feeling okay about getting something out of this game, as long as I could get my hands on that 4pt objective, I have 3 strong scoring units, 3 weak ones and 3 Vendettas, which can score if the objectives are placed high enough (Which I totally forgot about when placing my objectives....), so I felt confident as long as the Flying Tyrant doesn’t get into the squishy troops behind the blob and the Doom doesn’t cause too much chaos.

Deployment:

I was passed first turn and it was night fight turn 1, so I set about castling in my corner, Aegis out front, with the blob and attached Characters behind, on the left went both Grey Hunter packs and the Veterans, behind that lot went the hyperios missiles, the Warlord Command went in the Vendetta and Platoon Command started in reserve.  

Dave's deployment, Dave divided his army up, the 30 hormagaunts, 13 Termagants, Hive Tyrant on foot, Zoanthropes and Tervigon deployed opposite the blob, then on the extreme left flank went the rest of his army, so that's 3 Warriors, 20 Gargoyles, 2 separate Biovores and the winged Hive Tyrant (which is out of sight to the whole of my army).

Turn 1
Dave attempts to steal and fails, the blob struggles over the Aegis and gets 3” into no mans land, the Grey Hunters also struggle, due to night fight and lack of ranged weapons, I don’t do much damage, 7 of the 13 termagants are slain and one of the Zoanthropes goes down. Dave's turn 1, everything on the right moves forwards bar the Tervigon who poops out 18 gants! Who then in turn jump on the 3pt objective in the centre of his deployment zone, the mauled termagants move and run off to capture the 1pt objective in the top right corner, the Tervigon after spawning the gants moves to capture the 3pts objective in the top left, on the left flank everything moves forwards, still keeping out of sight behind a ruined Bastion. The Biovores then launch their shells into the blob, but cause minimum damage.

Turn 2
The blob moves up to consolidate its position in the midfield, the Grey Hunters still struggle about in the ruin they deployed in, all 3 Vendettas come on, 2 central, 1 on the right flank, the blob opens up into the hormagaunts, thinning them to about 18-20, the Grey Hunters also open up into the hormagaunts, thinning them by another couple. The Veteran squad try to drop the remaining Zoanthrope but fail, so the Hyperios missiles are needed and they do the trick, giving me first blood, the Vendettas fire into the Gargoyles, but only kill about 6 between them. Dave's turn 2 the Hive Tyrant on foot and hormagaunts on the right flank move up to the blob, the Doom stays in reserve, the Hive Guard move out of hiding and run towards the objective in the centre of his deployment zone which turns out to be Skyfire! The Biovores and Warriors hide behind the ruined Bastion, the Hive Tyrant with wings also surprisingly does the same, while the Gargoyles move behind a ruin on the extreme left flank. The Biovores switch target and fire into the Grey Hunters killing 1 and they fail moral, the Hive Tyrant and Hormagaunts declare charges, the Hormagaunts are reduced in number to about 6-7 by the time they hit the blob, the Hive Tyrant makes combat as well, issuing a Challenge which is accepted by the naked sergeant who dies to the hammer of wrath hit, the Tyrant Guard and Hormagaunts kill a handful of Guardsmen between them, while the Guardsmen can only reduce the Hormagaunts to about 3, the Tyrant Guard also takes a wound.

Turn 3
The Grey Hunters that can move do so towards the left flank as they move into range of the Gargoyles, the Platoon Command comes on and reinforces the 2pt objective in the centre of my deployment zone, the Vendettas all move to get LOS to the Hive Guard about to get on a Skyfire objective, they then open the shooting and kill 1 and reduce the other to 1 wound. Combat and the Hive Tyrant issues a challenge, which is accepted by a brave sergeant who obviously dies, the Hormagaunts and guard kill another few Guardsmen, the Hormagaunts and guard are then removed through weight of hits. Dave's turn 3, the Doom arrives next to the blob, but uses the Spore to hide from the Hyperios missiles, the Hive Tyrant moves over to a Vendetta, the Hive Guard move onto the Skyfire objective, the Hive Tyrant takes a hull point of the Vendetta, the Hive Guard then shoot down the Vendetta containing my Warlord company command, luckily 2 survive the explosion. The Biovores kill a couple of Grey Hunters from the pinned squad, but they pass moral! Combat sees the Hive Tyrant issue another Challenge, which is rejected, so a Rune Priest cannot attack, the Tyrant then kills a handful of Guardsmen who then strip 2 wounds off in return, but the other Rune Priests fluffs and causes no wounds!

Turn 4
The Grey Hunters both move out towards the objective on the left flank, the 2 Vendettas move around to get LOS to the Hive Tyrant while still flying, the Grey Hunters start the shooting phase by thinning the Gargoyles to just 4, the Hyperios missiles then fire into the Hive Tyrant and reduce it to 1 wound, which a Vendetta then finishes off, the other Vendetta then kills another Hive Guard, the Veteran squad then remove the Spore pod exposing the Doom. Combat continues and the blob drags down the Hive Tyrant giving me Warlord, then consolidate 5” spacing out. Dave's turn 4 and Doom moves up to the blob, the Gargoyles continue trying to hide, the shooting phase starts by the Biovores firing into the Grey Hunters again, this time scattering way off, the Doom then charges the blob and gets killed by a Force Weapon, the blob then consolidates 2” towards the 1pt objective in the top right corner.

Turn 5
The blob moves up and runs towards the objective in the top right, but they are short! The Grey Hunters move onto the objective in the bottom left, the Vendettas move to support, the Hyperios missiles open the shooting phase and go into the Hive Guard, but it goes to ground passing the 3+ cover saves. The Vendettas then remove both Biovores as the Grey Hunters remove the Gargoyles. Dave's turn 5, the Warriors move up to contest the objective on the left flank while the Hive Guard misses a Vendetta with a snap shot.

So at the moment, Dave has 7pts worth of objectives (2x 3pt and a 1pt objective), I have the 4pt objective and a 2pt objective.. so I NEED the game to go another turn... Dave then rolls a 3... game goes on!

Turn 6
The blob moves up to charge the Termagants, the Vendettas then find their killing ammo and remove the Warriors as the Grey Hunters move to consolidate their position on the objective bottom left, as the Hyperios Missiles kill the Hive Guard, the blob then charge and remove the Termagants, but also get me line breaker.  

We call it game there, as there is no time for another turn and Dave has zero shooting left. So there was a 3pt swing in the last turn, with me now controlling 4pt, 2x 2pt objectives, 1pt objective, while Dave still has control of the 2x 3pt objectives. I also have all 3 secondary missions for a 19-1 win!

Overall
Things went well, I got the objectives I set about getting, (top right, bottom left and my 2 central and bottom right) but I got lucky the game went to turn 6. But I was dominant in the game but Dave had control of the most objectives until turn 6! If it had ended turn 5 I would of lost 9-11! Luckily for me, it didn’t! I was happy to get a win in the first game and with it not being a 20-0 I hope to avoid some of the really nasty lists!

Next up game 2...

Read more ...

21 January 2013

Guard Tournament List

Rob speaking,

So, after my intro post the other day, I briefly talked about what army I’m currently using, Guard with Allied Space Wolves for those who missed it. This list has evolved quite a bit since it’s inception, I was originally running Space Wolves with Guard allies, but I have enjoyed using the guard way too much, so much so, they became the primary army.


I have been play testing a whole heap of lists for a good couple of months now in preparation for Caledonian Uprising 2013, Caledonian is a tournament I’m attending this January, last year Caledonian was my first tournament since coming back to playing 40k in late 2011, I had a real laugh and met people I now consider friends. So I have to say, anyone who’s not been to a tournament or is put off by the reputation of “tournament players”, I say give it a go! I’ve had nothing but fun, yet challenging games, win or lose!

So what is the army I hear you ask?

Primary Detachment: Imperial Guard

HQ1: Lord Commissar (70) Power Axe (10) [80]
HQ2: Company Command Squad (50) [50]
Troop1: Veteran Squad (70) Lascannon (20) [90]
Troop2a: Platoon Command (30) [30]
Troop2b: Infantry squad (50) Power Axe (10) Meltabomb (5) [65]
Troop2c: Infantry squad (50) Power Axe (10) Meltabomb (5) [65]
Troop2d: Infantry squad (50) Power Axe (10) Meltabomb (5) [65]
Troop2e: Infantry squad (50) Power Axe (10) [60]
Troop2f: Infantry squad (50) [50]
Fast1: Vendetta (130) Heavy Bolters (10) [140]
Fast2: Vendetta (130) Heavy Bolters (10) [140]
Fast3: Vendetta (130) [130]

Allied Detachment: Space Wolves
HQ1: Rune Priest (100) Master of Runes (50) Jaws of the World Wolf (0), Living Lightening (0) [150]
HQ2: Rune Priest (100) Storm Caller (0), Jaws of the World Wolf (0) [100]
Elite1: 3 Wolf Guard (54) 2 Terminator Armour (2x15) 2 Power Fists (2x10) 1 Bike (35) [139]
Troop1: 10 Grey Hunters (150) 2 Plasmaguns (1x10, 1xfree) [160]
Troop2: 10 Grey Hunters (150) 2 Plasmaguns (1x10, 1xfree) [160]
Fast1: 3 Hyperios Air Defence Battery (3x35) [105]


As you can see it’s a pretty blunt list, the guard will run, yes, run at the enemy until in rapid fire range, where they will remove basically any Infantry unit in the game! By moving so aggressively I hope to take control of the midfield, backed up by the 20 Grey Hunters they make a formidable foe. My anti-tank/flyer comes from 4 things, the Hyperios Battery and 3 Vendettas which are made much more reliable from the Comms relay, which will usually be manned by the Veteran squad or the either the Platoon or Company command squads.

Allowing the Guard to do as they please, they are boosted by the Rune Priests psychic powers, the Priests will usually be taking the Divination or Biomancy powers of which most of these will be vital to the success of this list. Buffing the Guard makes them super tough and/or super killy. 


The round 1 draw has been made and I’ll be facing Dave Williamson and his Tyranids, from the looks of things it’s a fairly straight forward list, 2 Hive Tyrants 1 flying, 1 on foot, Doom in pod, 3 Hive Guard, 2 Zoanthropes, Termagaunts, Tervigon, 3 Warriors with shooting and combat load outs, 30 Hormaguants, 20 Gargoyles, 2x1 Biovores.  To me, this looks like a mix of shooting and combat, which is not something you typically see in a Nid list, usually it's either one of the other.

So expectations, well I finished 50th out of 110 last year, this year there are only about 90 people signed up, so to beat last year I will have to come 45 or better, But I'm looking to finish in the top 30! So, here goes!

Read more ...
Related Posts with Thumbnails

IDIC Labels

Allies (3) Annihilation Barge (5) Anrakyr (3) Archon (1) Arjac (2) Army List Clinic (10) Artillery (1) Assault Phase (1) Attack Wing (1) Autarch (3) Avatar (10) Bases (10) Battle Reports (194) Belial (2) Bikes (11) Biovores (3) Bjorn (3) Black Legion (1) Blood Angels (9) Broodlord (7) C'tan (19) Canis (1) Canoptek Harvest (8) Carnifex (7) Cases (1) Challenges (17) Chaos Space Marines (18) Characters (3) Cities of Death (15) Command Barge (5) Community Cryptek (12) Crimson Hunter (4) Cryptek (13) Daemons (13) Dark Angels (7) Dark Eldar (25) Dark Eldar Conversions (1) Dark Elf (3) Dark Elves (3) Death Company (1) Deathmarks (3) Deceiver (2) Defence Line (3) Destroyer Cult (4) Destroyer Lord (4) Destroyers (11) Detachments (3) Dire Avengers (3) Display Board (1) Doom Sythe (6) Doom of Malan'tai (4) Doomsday Ark (7) DreadBall (3) Dreadnought Conversion (7) Drop Pod (3) Dwarfs (2) Eldar (207) Eldar Army Lists (22) Eldar Battle Reports (52) Eldar Conversions (25) Eldar Flyer (6) Eldar Tactics (9) Eldar Terrain (4) Eldar Webway Portal (2) Eldrad (2) Emperors Children (8) Empire (3) Endless Swarm (3) Falcon (5) Farseer (5) Fenrisian Wolves (2) Finecast (6) Fire Dragons (4) Fire Prism (6) Flayed Ones (34) Fluff (1) Footdar (2) Forge World (18) Formations (21) Free Hand (6) Games Day (1) Gargoyles (3) Genestealers (9) Ghost Ark (3) Gothic (15) Green Stuff (34) Grey Hunters (13) Grey Knight Battle Report (2) Grey Knights (2) Guard Battle Reports (6) Guardians (3) Harlequin Battle Report (8) Harlequin Tactics (1) Harlequins (14) Harpy (4) Heavy Destroyers (1) Help for Heroes Salamanders (40) Help for Heroes Ultramarines (29) Hive Crone (4) Hive Guard (2) Hive Tyrant (11) Hive Tyrant Guard (2) Hobby (36) Hormagaunts (1) How to Magnetise (21) How to paint (14) Immortals (3) Imotekh (3) Imperial Guard (7) Jetbikes (12) Laser Cut Card (40) Lethal Terrain (1) Lictors (2) Living Tomb (9) Logan (1) Long Fangs (10) Lukas (6) Lychguard (4) Maelstrom (2) Magnetising (53) Maleceptor (3) Man O' War (13) Man O' War Battle Report (4) Markers (10) Maugan Ra (2) Mawloc (13) Mechdar (13) Mega Nobz (6) Missions (7) Monolith (11) Movement Phase (1) Mycetic Spore (14) Mysterious Objectives (4) Necron Army Lists (46) Necron Battle Reports (78) Necron Conversions (26) Necron Decurion (15) Necron Lord (4) Necron Tactics (19) Necron Terrain (49) Necrons (310) Nid Warriors (3) Nidzilla (7) Night Scythe (8) Nightbringer (3) Objective Markers (7) Orikan (4) Ork conversions (6) Orks (18) Other (22) Outsider (1) Overlord (2) Overwatch (1) Painting Eldar (76) Painting Necrons (47) Painting Space Wolves (46) Painting Tyranids (53) Paints (7) Pariah (1) Phase Out (1) Polls (5) Psychic Powers (6) Pylon (3) Rangers (1) Raveners (4) Razorback (3) Reading 6th (18) Reaper Bones (1) Reclamation Legion (8) Rhino (2) Rippers (1) Rules (60) Rune Priest (3) Saim-Hann (20) Salamanders (38) Scarabs (15) Seer Council (6) Shadow Spectres (3) Shining Spears (1) Shooting Phase (1) Shrike (3) Skyblight (1) Space Marines (8) Space Wolves (111) Space Wolves Army Lists (12) Space Wolves Battle Reports (18) Space Wolves Conversions (16) Space Wolves Tactics (5) Special Rules (1) Spore Mines (2) Spotlight (44) Spyders (8) Super Phalanx (6) Supplements (1) Support Weapons (5) Swarmlord (4) Swiftclaws (2) Swooping Hawkes (1) Tactics (6) Tau (8) Termagants (5) Terminators (2) Terrain (48) Tervigon (7) Tesseract Vault (9) Thunderwolves (11) Tomb Blades (5) Toxicrene (5) Transcendent C'tan (5) Triarch Stalker (6) Trygon (13) Tyranid Army Lists (18) Tyranid Battle Reports (44) Tyranid Conversions (22) Tyranid Tactics (9) Tyranids (149) Tyrannocyte (8) Ultramarines (29) Unboxing (3) Unit Types (3) Veer-Myn (2) Vehicles (5) Venomthropes (2) Void Dragon (7) Vypers (1) War Walker (7) Warlocks (7) Warriors (8) Wave Serpents (9) We'll be Back (1) Weapons (3) Wolf Lord (4) Wraithblades (4) Wraithguard (4) Wraithknight (5) Wraithlord (1) Wraiths (14) Ymgarls (2) Zoanthropes (2) obelisk (9) painting Salamanders (22)