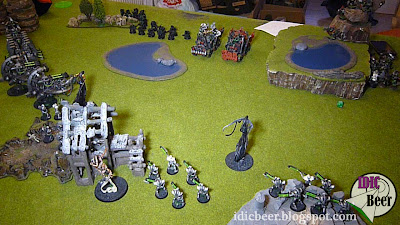
First up, thank you Fritz for coming up with his three C'tan challenge. It has been a pleasure taking up the challenge and coming up with a list that is all about taking three C'tan. You can check out how I went about building my list in this post, but here is my final list and a battle report against Orks that I did for my first game...
C’Tan Challenge list
HQ
1 x Overlord/Warscythe
/Mindshakle
Scarabs (115)
Royal Court:
1 x Cryptek/Eldridge
Lance/Solar Pulse (55)
1 x Cryptek/Tremorstave
(30)
1 x Cryptek/Tremorstave
(30)
1 x Cryptek/Tremorstave
(30)
1 x Cryptek/Tremorstave
(30)
ELITES
1 x C’tan/Dust/Worldscape
(240)
1 x C’tan/Time/Gaze (275)
1 x C’tan/Pyres/Thunder (245)
TROOPS
5 x Immortals/Tesla (85)
5 x Immortals/Tesla (85)
5 x Immortals/Tesla (85)
5 x Immortals/Tesla (85)
5 x Warriors (65)
1 x Ghost Ark (115)
HEAVY SUPPORT
1
x Annihilation Barge/Tesla (90)
1
x Annihilation Barge/Tesla (90)
The Orks list was something like this:
1 x Trukk with Thraka, 5x Nobz a FNP dude
1 x Trukk with 4x Mega Nobs and a Big Mek
20 x Shoota Boyz
20 x Slugga Boyz
15 x Strom Boyz
10 x Kommandos and Snikrot
10 x Lootas
Mission: Annihilation, Spearhead deployment
Deployment
I won the roll off and chose to take first turn. I didn't want the Orks going first, as experience has shown me how fast these boyz are, even without vehicles, and I need to get some shooting in before they are on top of me. Although I would love the Ork player to set up in the opposite corner and trudge all the way across the board, I am pretty certain he will reserve most of his stuff so that he can come on opposite my deployment zone. I deploy everything, hiding the 'Deceiver' shard behind a small ruined building, with my Barges far forward to get off any early shots. The Ork player sees my deployment and decides to reserve everything.
Turn One
Necrons
So now I know I have two turns before any green skins show up. I basically start to redeploy my force into a pitched battle formation with my vehicles to the left. I am sure the Orks will come on opposite my deployment zone, so I want to try and give my Annihilation barges some room to shoot them as they come across the table.
Orks
In reserve
Turn Two
Necrons
I continue to spread out everything. I move forward enough to stay out of the assault range of the rear flanking Kommandos, except for the hiding Deceiver and a lonely unit of Immortals in the corner to my right. I am betting the Kommandos will ignore the C'tan and go for the Immortals for an easy kill point. I try to judge the forward distance so that I am out of assault range of the Storm Boyz and Trukks as they come on from their board edge.
Orks
Orks roll for reserves and they seem pretty angry as everything comes out except for the Slugga Boyz. Storm Boyz move on 16" to the right and the Lootas go next to them into terrain, three Lootas go down from Worldscape. Both Trukks move on 12" staying together for Big Mech's cover saves and the Shoota Boyz come on to the left. The Kommandos go all out for two kill pints as he Waaagh's them through terrain to take on two units of Immortals. As they assault, Snikrot looses a wound and both the power weapons die from Worldscape, which really helped me hold up in the assault as the combat is tied.
Turn Three
Necrons
I move up my assault C'tan over to help the Immortals kill off the Kommandos, and shoot Thundrbolt at the Trukks and miss. My Barges then shoot into the Trukks immobilising both of them, I would have liked to of done more damage for the kill points, but now everyone is on foot I am very happy. I shoot one Tremorstave into the Storm Boyz and another into the Shoota Boyz and hope that it will slow them down enough for me to start moving backwards with my Immortals next turn. The C'tan assaults the Kommandos and kills them for a kill point.
Orks
The Slugga Boyz stay in reserve as both Trukks unload, moving and running slowly towards my Immortals. Two big shootas from the Boyz and the Lootas both shoot my Shooting C'tan on the right, taking him down to two wounds. The Storm Boyz move 18" right in front of my Immortals on the right loosing a few from the Quake. With the C'tan down to two wounds the Storm Boyz multi assault me taking out three Immortals and the C'tan. The C'tan explodes and wipes out most of the Boyz who then start to run under half strength.
Turn Four
Necrons
So now I am two kill points to one up and start to move my Immortals back away from the Thraka unit and the Mega Nobz. I start moving my assault C'tan toward the two Trukks and the Boyz on the left. One Tremorstaff goes into those Boyz to slow them down and the Annihilation barges shoot the two Trukks who make ALL their cover saves from big mech. The rest of my army shoots at the Mega Nobz and I end up killing nothing.
Orks
Thraka moves over and joins the Mega Nobz to free up the Nobz from Slow and Purposeful, as both units continue to move towards my two Immortal groups. This time the Slugga Boyz come on from reserve and take a pop shots at my Arks rear armour with their Big Shoota's, but do nothing. The Shoota Boyz risk the quake and move toward my C'tan loosing a couple on the way, and blasts the C'tan along with the Lootas, taking him down to one wound. With no guns left to finish him off, the Boyz assault the Shard killing him, but again loosing a number of Orks in the explosion. The five Boyz left consolidate into a pond for cover, and it's two kill points each.
Turn Five
Necrons
Turn five and potentially my last turn. With both Trukks still getting cover saves from Big Mech, I turn all my guns onto the five Boyz in the pond, as my Immortals and Deceiver keep moving away from the advancing Orks. Tremorstaves hit all round as my Annihilation Barges and Ark wipe out the five Boyz, even with them going to ground.
Orks
The big mech dies on a one as the group moves again towards my Immortals and the Nobz head toward the three Immortals on my right, but they move very slowly from the quake. The Lootas shoot into the three Immortals killing one of them, and two Big Shootas miss my Ark. The Boyz are out of assault range, so run towards my Immortals to get them next turn.
It's three kill points to two to the Necrons now, and we roll to see if the game ends, but it doesn't...
Necrons
I finally realise that I forgot to use my Solar Pulse and pop it off. I can see that two groups of my Immortals are in trouble now as I have nowhere to run, so I need to get two kill points this turn to stay one in front. The Tremorstave continues to keep the Slugga Boyz in terrain and I take out a Loota with the others. With no Big Mech around, both Annihilation Barges open up on the two Trukks destroying both of them. Five kill points to two.
Orks
With night fight now up which was probably the perfect time for me after all, the Lootas are unable to do anything. As predicted I loose two Immortal groups to the Thraka unit and the Nob unit. The Slugga Boyz move well through the rough and dangerous terrain assaulting my Ark. They get a couple of sixes to hit me and roll a glancing hit on the chart, only scoring a one which I negate with my living metal.
Necrons are five kill points to four up as we roll to see if there is another turn, and there is...
Turn Seven
Necrons
I move everything away from the Orks to the left side of the board and open up with my Tremorstaves on anything that can move. I shoot the Barges into the Mega Nobs and reduce them down to one guy with just one wound, but no kill points.
Orks
With nothing in range and fear of loosing the last Mega Nob, Orks move nothing. They pick on a lonely group of Immortals and shoot everything they have at them. They kill a few and one stands back up, but no kill points. Games ends five kill points to four to my Necrons.
Conclusions
I have enjoyed using a C'tan shard before, but I have never had three on the table. They do, and will go down quickly without Stormlord to protect them, but then again, I got most of my kill points from shooting, which I wouldn't of done if Stormlord had been around. I really had fun building and playing my list, and I will definitely continue to use it for some more fun games in the future. So a massive thank you to Fritz for setting his three C'tan challenge, I really had fun.


.JPG)


I've got to admit I skipped over the battle report mostly and only read the first few bits, I was really trying to see what you're doing with the Overlord, but could not see what you had done with him.
ReplyDeleteIt seems like the C'Tan are catch 22. You need the Stormlord to help them survive, but Necrons are a shooting army and Stormlord hinders them. I guess you could make a assault style army with triple C'Tan, single unit of Scarabs with Spyders support, double Wraith units, then two Ghost Arks with blocks of Warriors.
How did you find the Tremorteks btw?
The Overlord was in the Ark with the Lance Cryptek, you are right I didn't actually say that in the report. Tremorstaves were awesome, It was the first time I have used them, but coupled with Worldscape, they did their job well. I suppose it's like anything really, they will only work if the list is works together with them as a hole.
ReplyDelete2+ dangerous terrain isn't it?
ReplyDeleteSubject: [idicbeer] Re: IDICBeer 40k: Fritz C' tan Challenge Battle Report (not video)
It's only a 2+ if the terrain is already dangerous.
ReplyDeleteOk, so does this stack with Tremorteks?
ReplyDeleteSubject: [idicbeer] Re: IDICBeer 40k: Fritz C' tan Challenge Battle Report (not video)
Tremorstaves just makes movement in open as if you were in rough terrain, so any movement with Worldscape around means you will die on a one :D
ReplyDeleteOk, so for vehicles would be dangerous on a 2+ :)
ReplyDeleteSubject: [idicbeer] Re: IDICBeer 40k: Fritz C' tan Challenge Battle Report (not video)
Yes I suppose it would :D
ReplyDelete