Nick speaking,
I am very pleased to say I have now built the 'Cyborg' Defence Line that I received from
Laser Cut Card not so long ago. You can see a few pictures of the Defence Line in it's unmade state
here, where I recently posted about receiving it. Now the thing to bear in mind about this product and Laser Cut Card itself. Is that it is run by Neal, who is just a fellow hobbyist who started making a few pieces of terrain for his own personal use, and was encouraged my his friends to sell some of it. Neal runs his website and makes this product along with others, all by himself.
Right, so here is my built Defence Line and a little review of the product...
I am pretty certain that you are probably thinking the same things that I was thinking when I first set eyes on this little gem, so let me answer those questions right away...
1)
What glue do I use?
My initial thoughts were that you would have to use PVA glue, and that you would be waiting around for it to dry for ages with
elastic bands and stuff, but super glue is absolutely perfect for this
job. All you have to do is hold the section in place, drop some Super
glue on the join and wait a few seconds for it to dry. You don't even
have to get it in the gap of the join, as the glue soaks into the
cardboard and fixes it that way.
2)
If it's made of cardboard, it must be pretty flimsy?
Well, although this product looks like it just folds together and glues into place, it is actually so much more than that. The template of Neal's work is incredibly well done, and the depth of the blueprint design just shows you how talented he is. Each main section of the piece has three layers to it, and when all glued together, is actually very strong.
The only sections that do not have the three layers to it is the upper struts, where the pattern on the side piece has a gap, leaving a small section with only one piece of card. This does seem a bit more vulnerable than the rest, but I solved this problem by putting some extra superglue in that area. The superglue soaked into the card and when it was dry brought the strength back into it with no trouble at all...
3)
If it's cardboard, it must be a pain to build?
I have to be honest here, without Neal's instructional guide that he provides via email, I would not be able to build this at all. It's in no way just a fold and glue job as I first thought it would be, and that is why the end result looks as good as it does. Following the instructions is a doddle, they are very well done, with both pictures and simple text. Once I had built the first section, I rocketed through the rest with no trouble at all.
4)
Is it the correct size to stand in as an Aegis Defence Line?
Yes, it is perfect, just the right size and has the same amount of bits as you get in the GW set.
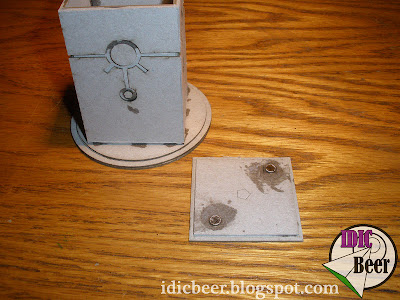
As for the 'Cyborg' Monolith section, which started life as an Obelisk and then was adapted to be the 'gun' section the Defence Line. I liked the look of both of these designs, so I decided to magnetise my one up into both incarnations. First I magnetised the underside of the lid...
Then I cut a couple of holes out and magnetised the two top sections, keeping the magnets flush so that the pieces sat flush.
It's fair to say that the Crystal itself is a bit trickier to build than the rest of it. You will need to take your time and be patient, doing one section at a time. I did mine using a small pieces of Blu-Tack behind each section, holding it together before I glued it as I built up the sections seemed to make it a bit easier to build...
Now all I have to do is paint it up, but there is still more. You end up with loads of left over cool pieces, which is going to be perfect for blinging up my other Necron Terrain, how amazing is that!
So there you go, as you can see, I am very happy with this product and I am definitely going to have a look at getting some of the other bitz that Neal also makes. Please go and check out his
Website and don't forget to go over and follow his
Blog where you can see all the other stuff he is working on....


.JPG)


